Official guide · iPhone / iPad walkthrough
Shadowrocket Setup Guide
Start with your existing subscription or server details, then add a server, choose Global Routing, connect, and verify access. Complete the full flow once before adjusting rules or On Demand.
- Add or import
- Config / Proxy / Direct
- Connect and verify
Before you start and jump to a step
Follow the steps in order for your first setup. If you already have a server entry, start with choosing a mode.
The images below are official App Store screenshots for identifying interface elements. Server names and field values shown in screenshots are not connection details to copy; always use the information from your own service provider.
Add a server or import a subscription
Importing a subscription and entering details manually are two different paths. Choose the one that matches the information you have.
Have a subscription link? Select Subscribe
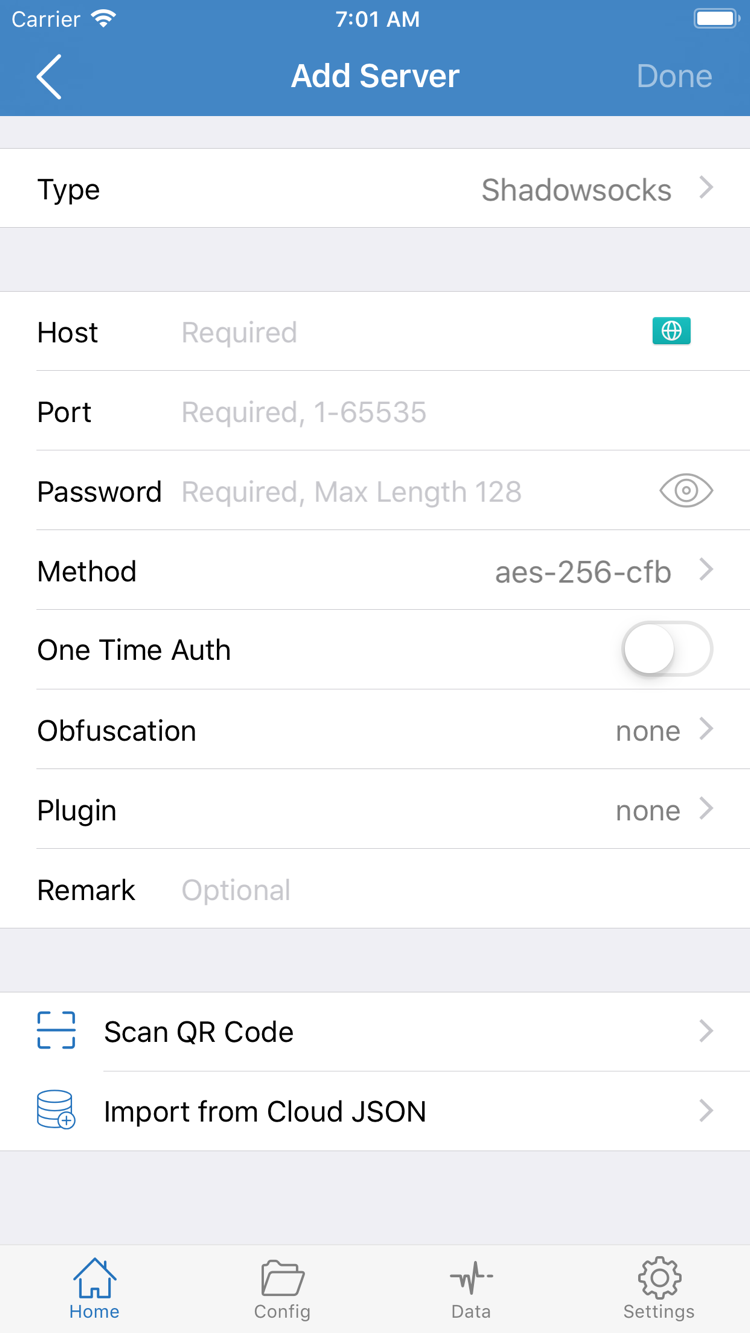
Open Shadowrocket, go to Home, and find Add Server in the SERVER section, or use the add entry on the page. On the add screen, check Type first. If you have a subscription link, set Type to Subscribe, enter the complete link in URL, and add a name you can recognize in the remarks field. The remark only helps identify the source; it does not change the server connection parameters.
Before pasting, check that the link is complete. Line breaks in a messaging app, spaces included during copying, or missing text after a question mark can cause an import to fail. Subscription links often contain personal access credentials. Do not post them in public comments or include them in screenshots visible to others. After saving, wait for the import to finish and return to Home. A group of server entries under SERVER means the app has retrieved and parsed the subscription.
If no entries appear after saving, check whether the error occurred while downloading the link or parsing its contents. Opening a webpage in a browser does not mean its address is a valid subscription link; a login page, a sharing page, and subscription content are different things. Ask your service provider to confirm the link's purpose and supported format. Avoid repeatedly adding the same subscription, which can make it harder to identify the active source later.
Have server parameters? Enter them by Type
If you have an address, port, and authentication details, select the matching Type in Add Server. For example, with Shadowsocks, check Host, Port, Password, and Method one by one. Other protocols use different fields, so do not switch protocols just to make the form look similar. Enter the server address in Host and the port in Port; Password and Method must match the original details exactly.
Servers that use TLS may also require parameters such as a server name. Do not paste the entire subscription URL into Host or enter a full website path as the server address. If details are missing, ask for them rather than bypassing an error by disabling verification at random. Use Scan QR Code to scan an existing QR code. Import from Cloud JSON is for importing a configuration; do not use it in place of Subscribe just because both involve a link.
After saving, return to Home and select the server you want to use. Check that the selection indicator is on the expected entry. Importing only saves details in the app; it does not establish a connection. Next, decide whether traffic should follow rules, use a proxy, or connect directly, then turn on the connection switch. This makes it easier to locate problems.
Choose a Global Routing mode
Check the mode first, then check the rules. The selected server may be correct, but traffic can still behave unexpectedly if the routing mode is wrong.
Return to Home and open Global Routing. For a first setup, distinguish between the three modes: Config, Proxy, and Direct. They control how the app handles traffic; they do not fill in server parameters or make an unavailable server work. Note the current selection so you can restore it after testing.
Config: match traffic against the current configuration
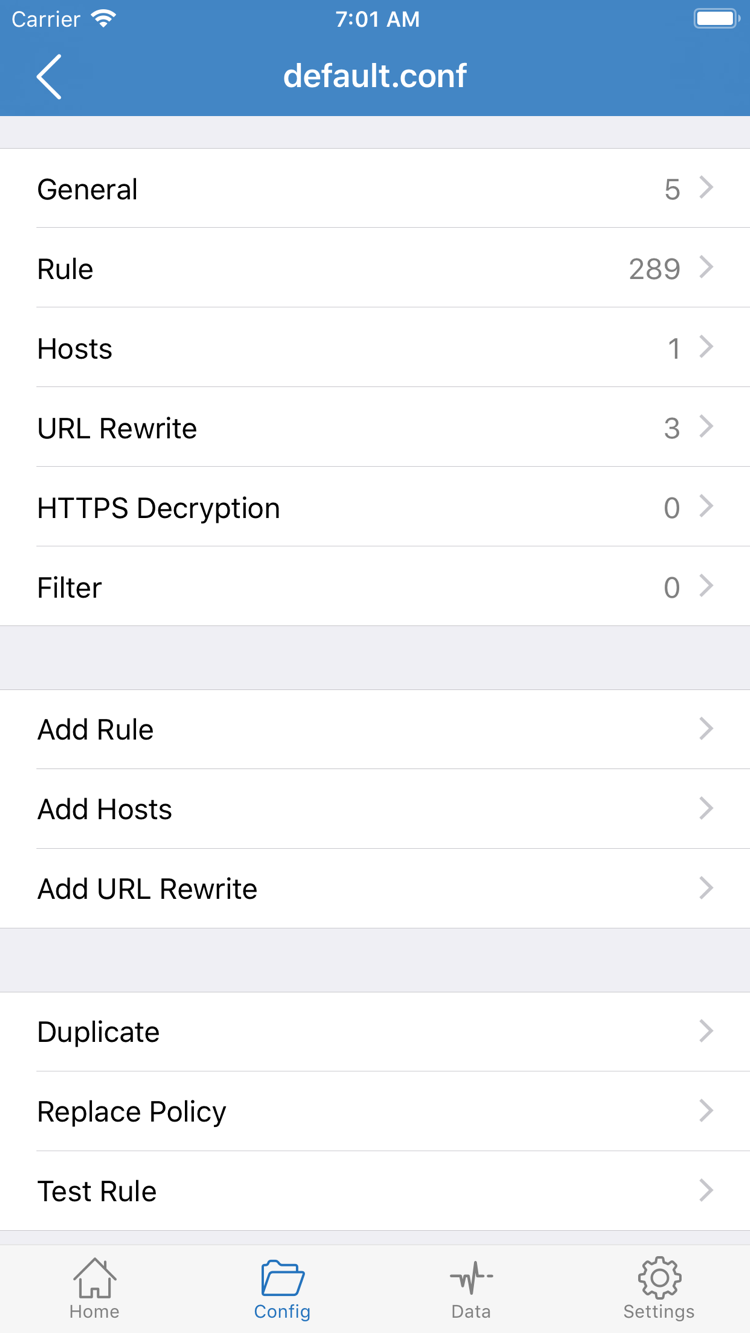
For rule-based routing, select Config, then open Config to check which configuration file is in use. The configuration editor has sections such as General, Rule, Hosts, URL Rewrite, and HTTPS Decryption. At first, focus on Rule and the current configuration selection; there is no need to adjust every section. In particular, do not change HTTPS Decryption when it is unrelated to your connection test.
Rules in Rule are matched in order. Traffic that matches an earlier rule is not passed on to later ordinary rules. The two lines below illustrate the structure for “proxy a specified domain and connect directly to everything else.” example.com is a sample domain, not a server address. PROXY is a policy value; check that the corresponding policy exists in your current configuration and suits your goal before using it.
DOMAIN-SUFFIX,example.com,PROXY
FINAL,DIRECT
The order matters: the domain rule comes first, followed by the FINAL fallback. If FINAL is placed earlier, later rules may not get the chance to match as intended. If you already have a working configuration, you do not need to copy this example. To add a rule, open Add Rule in the Rule section and, after saving, check that you edited the configuration currently in use, not another file with the same name.
Proxy and Direct: choose a specific traffic path
Proxy sends traffic handled by the app through the proxy path, which is useful for briefly checking whether the selected server can access a destination. Direct uses a direct connection and cannot be used to determine whether the proxy server is working. Neither mode is an “automatic network repair” switch. Access also depends on the underlying network, server status, and destination service.
If a destination works in Proxy but fails in Config, check which rule matched and the policy it points to rather than importing the subscription again. For rule coverage and more advanced mode choices, see the proxy mode guide. For a first setup, keep a configuration that you can identify and restore.
Turn on the switch and connect
Check the selected server and mode once more before connecting. The first connection also requires system authorization.
After completing the first two steps, return to Home. Check the selected entry under SERVER and confirm Global Routing is set to the mode you chose. If the list contains several similar names, open an entry and check its address or remark rather than relying on its position. List positions can change after updates, and similar names do not mean the parameters are the same.
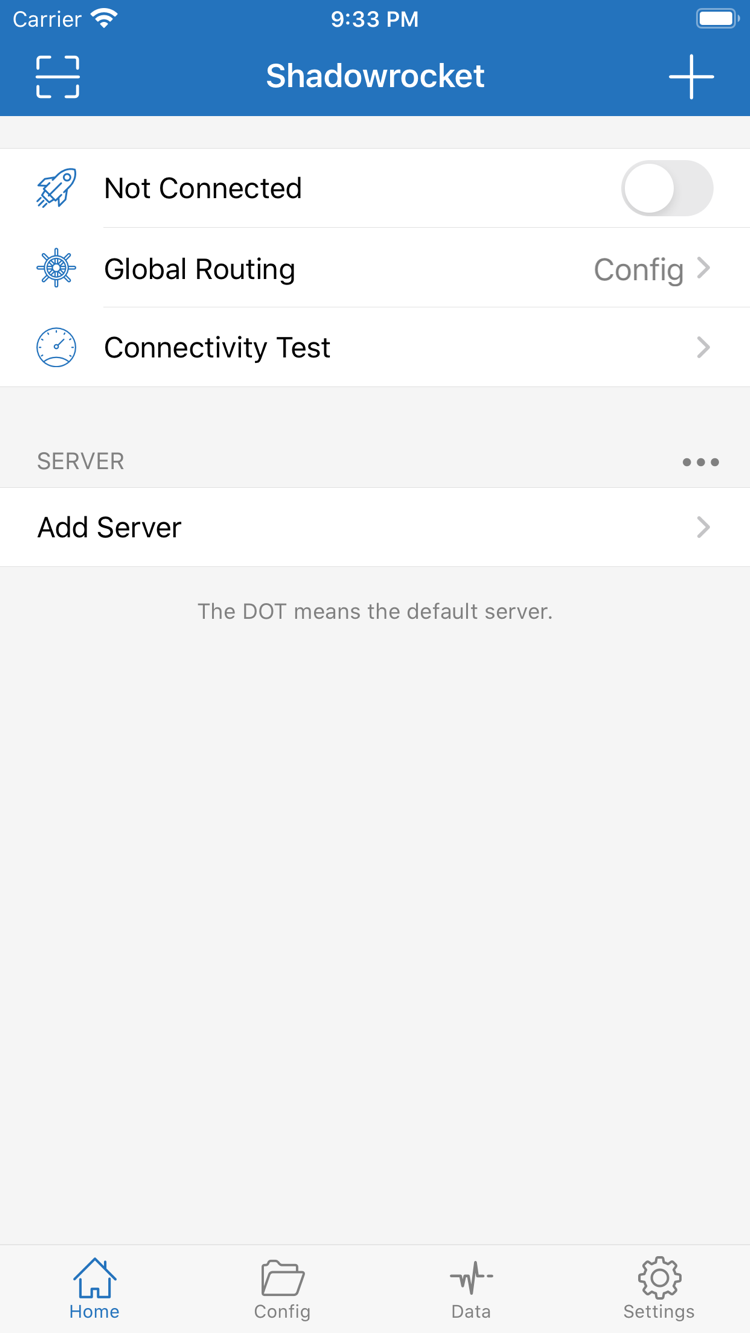
Turn on the connection switch at the top of Home. The first time you connect, your iPhone or iPad displays a system prompt to add a VPN configuration. Read and confirm the prompt, complete the required password or biometric authentication, then return to Shadowrocket to check the status. This grants permission to establish a network tunnel on the device; it does not purchase a connection plan or confirm that the selected server is reachable.
If you previously declined the system prompt, the switch may not stay on. Start the connection flow again and watch for the system dialog; avoid tapping the switch repeatedly in quick succession. If another VPN connection is active in the system, turn it off and try again to avoid two connections competing for the network path. Managed devices may have organizational restrictions; check with the device administrator, as repeatedly changing server parameters usually will not help.
Once the switch stays on and the page no longer shows Not Connected, continue to verification. A VPN status in the system only means the tunnel is established; it does not prove that every website uses a proxy path. Under Config, some destinations may connect directly according to the rules, so a page loading in a browser does not prove that all rules are correct.
If the switch turns off immediately, note whether an authorization prompt or error message appears, then check system permissions and the current configuration. If the switch stays on but webpages do not load, keep the current state and proceed to verification and troubleshooting. Do not delete servers, replace the configuration, and change DNS all at once. Separating “can the tunnel be established?” from “can traffic pass after connecting?” reduces repeated steps.
The basic flow is the same on iPad and iPhone. When using split screen or landscape mode, make sure Shadowrocket is in focus. After completing system authorization, return to Home and check the final status; switching the app to the background does not mean authorization failed. When you finish testing, return to the top and turn off the connection switch.
Verify the connection and routing results
Check the server test, tunnel status, and actual access separately to identify which layer is working.
In Home, tap Connectivity Test and wait for the result. The test can reveal an obviously unreachable server, but a passing test does not guarantee access to every website. A failed test also needs to be interpreted in light of the test method. Do not judge whether the configuration is correct by a result's numerical value alone. First check whether the test completes and whether the result is consistent when repeated.
Then open a browser and visit a website you already need to check. For your first test, use one fixed destination and note whether it loads, whether only some resources fail, and what error appears after waiting. Cached content can hide a change in routing. After switching modes, reload the page. If the app keeps an existing connection open, close that visit and make a new request rather than judging by a page that was already open.
With Config, verification should also check the routing rules. A domain that should use a proxy should match the relevant proxy policy; a destination that should connect directly should remain direct. If the page loads but the route is not as expected, return to Config and check Rule order and the target policy. A single page may request resources from multiple domains, so a rule for the main domain may not cover every resource on the page.
To narrow down the cause, keep the same server and test website, temporarily switch Global Routing from Config to Proxy, and make a new request. If Proxy works but Config does not, check the rules, DNS, and policy references first. If both modes fail, check the server parameters and underlying network first. Restore the original mode after comparing them so a temporary test setting does not become your everyday setup.
Finally, run a basic comparison: disconnect Shadowrocket and check whether your usual websites work on the regular network. If they fail while disconnected too, first check Wi-Fi sign-in, cellular data permissions, or the network itself. After comparing, reconnect using the original settings. Changing one variable at a time makes it easier to identify what actually affects the result than changing several settings in succession.
Check settings based on where it fails
Identify the failed step first, then change the relevant parameter. You do not need to try every switch in Settings when getting started.
Import fails: check the link and its contents
If you get stuck at the first step, check that the subscription link is complete and still valid, and that your underlying network can reach the address. A failed update to an imported subscription is not the same as an existing entry becoming invalid. Keep the current entry, record the error, and ask your service provider to confirm the link status. If you need to import it again, identify the old subscription name first so you do not mistake a duplicate entry for a new server.
If a manually added server consistently fails its test, return to Add Server and check Type, Host, Port, and authentication parameters in order. Password capitalization, the Method selection, and TLS-related names can all affect the connection. Compare each item with the original details. Do not infer parameters from someone else's screenshot or combine fields from different servers.
Test fails: check Test Method first
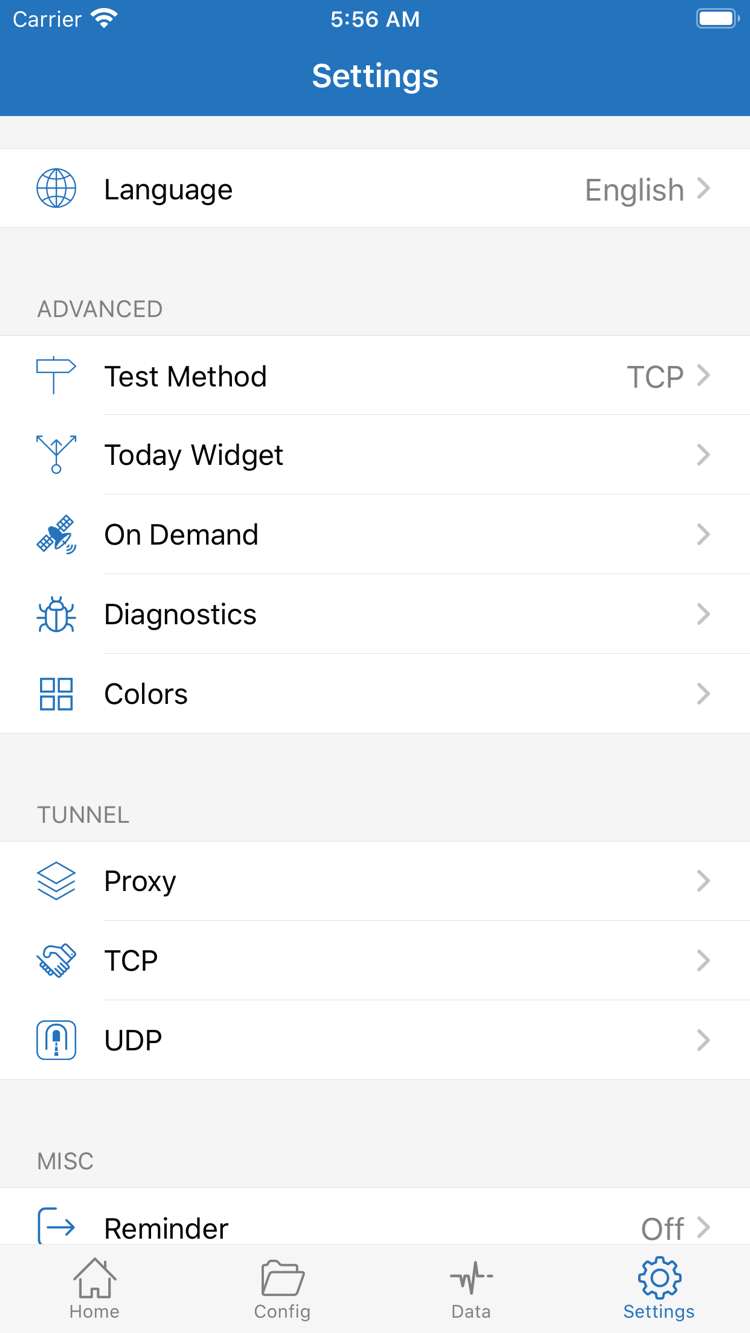
Open Settings and check Test Method to see which test method is selected, then interpret the Connectivity Test result in Home accordingly. Different methods may check different parts of the connection, so failure with one method does not mean the entire server is permanently unavailable. Keep the method fixed and compare the same server on the same network, then consider actual access as well. Do not change the mode, network, and test method all at once before each test.
Switch keeps changing: check authorization and On Demand
If the switch will not stay on, first make sure system authorization from step three is complete and turn off any other active VPN connections. If the connection changes automatically when switching Wi-Fi, locking the screen, or reopening the app, check On Demand in Settings. On-demand connection conditions may trigger a reconnection. For troubleshooting, note the original settings, temporarily pause the relevant conditions, and retest with the manual switch. Restore any settings you still need once you have identified the cause.
Do not delete every network configuration on your device, especially if it includes work or school management settings. If the system prevents adding a VPN configuration, check with the device administrator. If there are no such restrictions and the error persists, record the system prompt and the steps that trigger it before continuing your investigation.
Connected but access fails: keep conditions reproducible
If the connection stays on but pages do not load, compare Config with Proxy first, then check whether all destinations fail or just one. If IP connections and domain access behave differently, investigate DNS next; do not repeatedly enter DNS addresses from unknown sources. If text loads but images do not, resource domains may not be matching the expected rules; this does not necessarily mean the entire proxy is down.
Diagnostics in Settings can help collect error information. After reproducing the issue, record the steps, network type, selected mode, and error message. Before sharing diagnostic material, check whether it includes a subscription link, server address, password, or other personal information. Options such as Proxy, TCP, and UDP affect more detailed connection behavior. When getting started, avoid changing several at once just to experiment.
If these checks do not identify the cause, go to the complete troubleshooting guide for more on switches, timeouts, subscriptions, and DNS. Questions about purchases, recovery, and common tasks are covered on the FAQ page. A set of symptoms you can describe and reproduce is more helpful for finding the next step than simply saying “the connection does not work.”
Download options for other devices
The steps above use an iPhone / iPad as an example. The iPhone / iPad version is a one-time App Store purchase of $2.99; the Mac (Apple Silicon and Intel), Windows, Android, and Linux versions are free. Installation packages for other devices are available from this site's download page, under /dl/shadowrocket/.
Device-aware buttons show options for the current device. Mac does not automatically detect its chip; check About This Mac first. If the system blocks a first-time installation, read the download page's installation permission guide and follow the steps for your system.
Current version · iPhone / iPad $2.99 one-time purchase; Mac, Windows, Android, and Linux free